WinAFL-환경구축
1. Overview
WinAFL을 설명하기 전에 먼저 AFL에 대해 간단하게 설명하자면...
AFL은 America Fuzzy Loop의 약자로 Michal Zalewski 라는 보안 전문가가 개인 홈페이지에서 만들어 공개한 Coverage-guided 기반의 퍼저이다. 구글에서 만들었다고 하는데... 그는 구글 직원이다. 2.53b 버전부터 개인 홈페이지가 아닌 Google Guthub을 통해 오픈소스로 제공되고 있다.
AFL의 가장 큰 장점은 사용 방법이 크게 어렵지 않다는 점과, 루프 실행을 통해 빠른 속도로 퍼징이 가능하다는 점이다. 구현 자체는 굉장히 복잡하게 설계되어 있지만... 사용자 입장에서 고려할 사항은 아니다. 물론 오픈소스이므로 이를 커스텀하여 특수 목적에 맞는 AFL 기반의 퍼저 개발이 가능하다는 것도 어떻게 보면 큰 장점이 아닐 까 싶다. 물론 이를 위해서는 아주 많은 개발 및 보안 지식을 요구한다.
부가적으로 AFL의 특징을 조금 더 설명하자면, 바이너리 계측(Instrumentation) 기법과 유전 알고리즘(Genetic Algorithm) 을 잘 활용하여 주어진 테스트케이스로부터 새로운 실행 경로(Execution Path) 분석을 통해 넓은 코드 커버리지를 지원한다.
WinAFL은 이러한 AFL을 Windows에서 사용할 수 있도록 변형한 도구이다.
이번 포스팅을 통해 WinAFL을 통해 퍼징이 가능한 환경을 구축해보자.
2. Environment Setup
WinAFL 환경 구축을 위한 준비물은 아래와 같다.
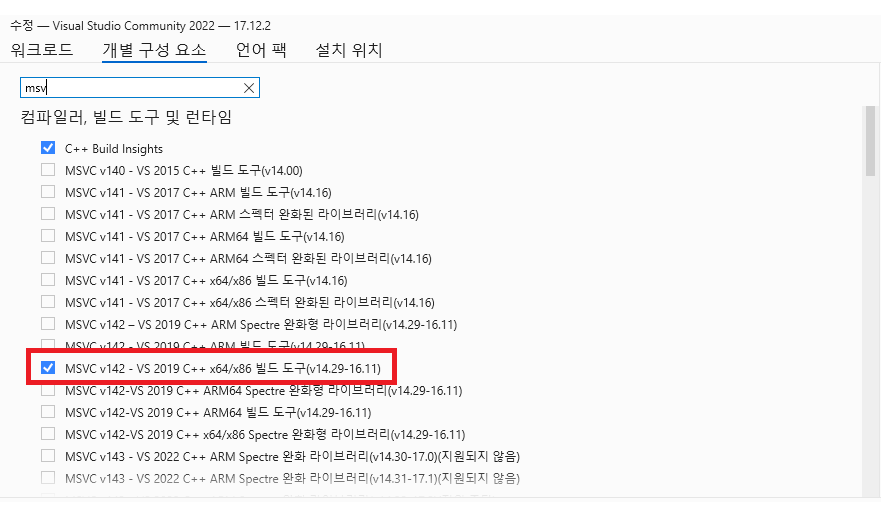
1. Visual Studio (필자 2022 Community 버전 사용, 가급 적 최신 버전 사용 권장)
2. DynamoRIO
3. WinAFL
Visual Studio 설치 시 MSVC v142 - VS 2019 C++ x64/x86 빌드 도구를 반드시 설치하자.
Visual Studio 와 빌드 도구 설치가 완료되었다면 github에서 먼저 WinAFL 소스를 받아오자.
PS C:\Users\shild\Desktop\fuzz> git clone https://github.com/googleprojectzero/winafl
Cloning into 'winafl'...
remote: Enumerating objects: 1876, done.
remote: Counting objects: 100% (455/455), done.
remote: Compressing objects: 100% (160/160), done.
remote: Total 1876 (delta 354), reused 321 (delta 295), pack-reused 1421 (from 1)
Receiving objects: 100% (1876/1876), 5.42 MiB | 13.62 MiB/s, done.
Resolving deltas: 100% (1069/1069), done.
PS C:\Users\shild\Desktop\fuzz>
이후 Intel Processor Trace 지원으로 빌드하기 위해 ReadMe.md 에서 설명한 내용에 따라 Git 저장소에 저장된 서브모듈(Submodules)을 가져오고 초기화 하는 작업이 필요하다.
PS C:\Users\shild\Desktop\fuzz\winafl> git submodule update --init --recursive
Submodule 'third_party/TinyInst' (https://github.com/googleprojectzero/TinyInst.git) registered for path 'third_party/TinyInst'
Submodule 'third_party/processor-trace' (https://github.com/01org/processor-trace) registered for path 'third_party/processor-trace'
Submodule 'third_party/winipt' (https://github.com/ionescu007/winipt) registered for path 'third_party/winipt'
Cloning into 'C:/Users/shild/Desktop/fuzz/winafl/third_party/TinyInst'...
Cloning into 'C:/Users/shild/Desktop/fuzz/winafl/third_party/processor-trace'...
Cloning into 'C:/Users/shild/Desktop/fuzz/winafl/third_party/winipt'...
Submodule path 'third_party/TinyInst': checked out '2d9472e740874d69293a82ff6eb3eb7ddeebff5e'
Submodule 'third_party/mbuild' (https://github.com/intelxed/mbuild) registered for path 'third_party/TinyInst/third_party/mbuild'
Submodule 'third_party/xed' (https://github.com/intelxed/xed) registered for path 'third_party/TinyInst/third_party/xed'
Cloning into 'C:/Users/shild/Desktop/fuzz/winafl/third_party/TinyInst/third_party/mbuild'...
Cloning into 'C:/Users/shild/Desktop/fuzz/winafl/third_party/TinyInst/third_party/xed'...
Submodule path 'third_party/TinyInst/third_party/mbuild': checked out '03ee9d52adb7f01d476ced0dba1534cfc7edff36'
Submodule path 'third_party/TinyInst/third_party/xed': checked out '5976632eeaaaad7890c2109d0cfaf4012eaca3b8'
Submodule path 'third_party/processor-trace': checked out '257202c1fc41687d998e1a82ba1076f816c5c3d5'
Submodule path 'third_party/winipt': checked out 'c78e561698fc95bfe4c3817d2efc71b3526c325a'
WinAFL 다운로드가 완료되면, config.h 파일에서 하기와 같이 코드를 수정한다.
#define MAX_FILE (100 * 1024 * 1024)
그리고 git을 사용하여 DynamoRIO도 다운로드 해준다.
PS C:\Users\shild\Desktop\fuzz\winafl> git clone https://github.com/DynamoRIO/dynamorio
Cloning into 'dynamorio'...
remote: Enumerating objects: 79511, done.
remote: Counting objects: 100% (10781/10781), done.
remote: Compressing objects: 100% (1064/1064), done.
remote: Total 79511 (delta 10243), reused 9973 (delta 9714), pack-reused 68730 (from 1)
Receiving objects: 100% (79511/79511), 113.80 MiB | 11.01 MiB/s, done.
Resolving deltas: 100% (66206/66206), done.
Updating files: 100% (2467/2467), done.
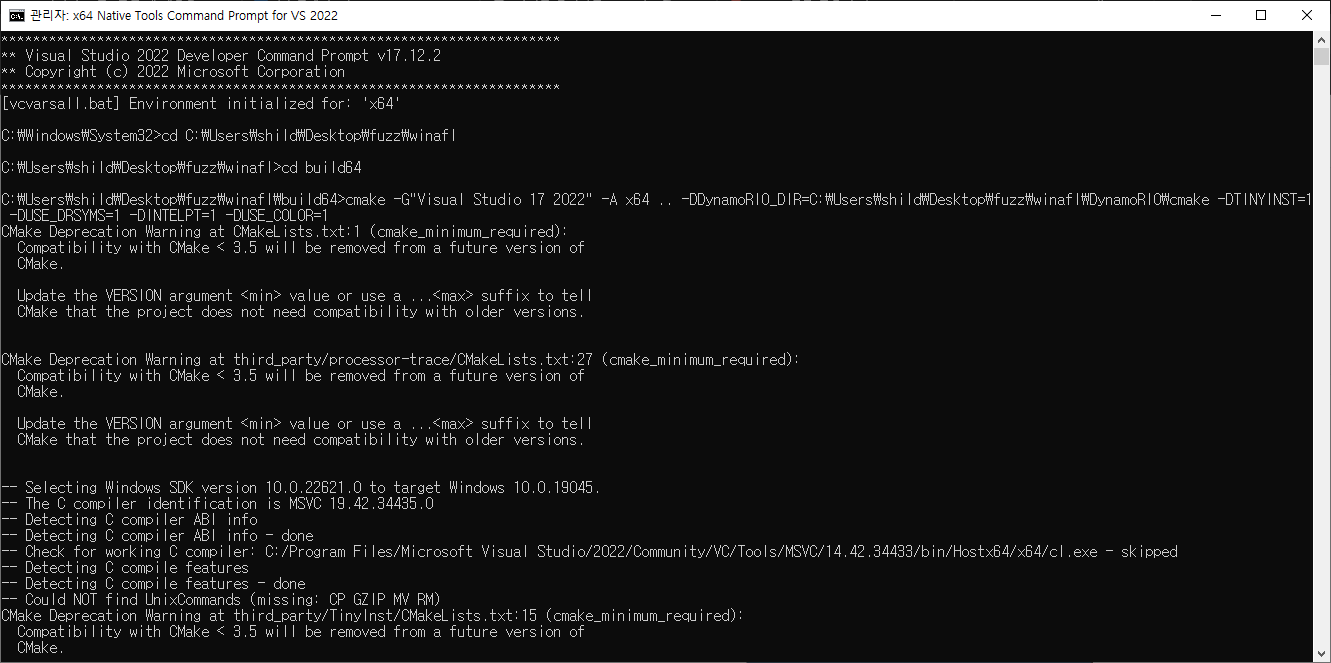
다운로드가 완료되면 README에서 설명하는 내용에 따라 빌드를 진행한다. 빌드 수행 시 다운로드 받은 Visual Studio Build Tool을 이용한다.

mkdir build64
cd build64
cmake -G"Visual Studio 17 2022" -A x64 .. -DDynamoRIO_DIR= <path to dynamorio dir> -DTINYINST=1 -DUSE_DRSYMS=1 -DINTELPT=1 -DUSE_COLOR=1
cmake --build . --config Release
빌드 환경 설정이 완료되었으면 cmake를 이용하여 빌드를 진행하면 된다
cmake --build . --config Release
빌드가 완료되면 해당 디렉터리의 bin/Release 경로에 afl-fuzz.exe 파일이 생성된다.

다음 포스트에서는 타겟을 선정하고 하네스 코드를 작성해보도록하겠다.